How To Make A Glistening Glass
Homemade Bird Bath

A glass birdbath glistening in the sun is a beautiful thing.
Then when your cherished backyard birds land on it to take a sip of water, it is like the cherry on top of the sundae!
This glass bird bath is easy to make and a delight to own.
Labour is the biggest expense, as all the materials are recycled household items, purchased at yard sales and thrift shops.
There is so much to be gained by repurposing household items, by putting them to further use.
By using items again we are reducing the need for more landfill space.
The space we are saving allows our Chickadees, Cardinals, Hummingbirds and other backyard birds
to have the habitat they need to raise and feed their babies.
2 Steps To A Glistening Glass Homemade Bird Bath:

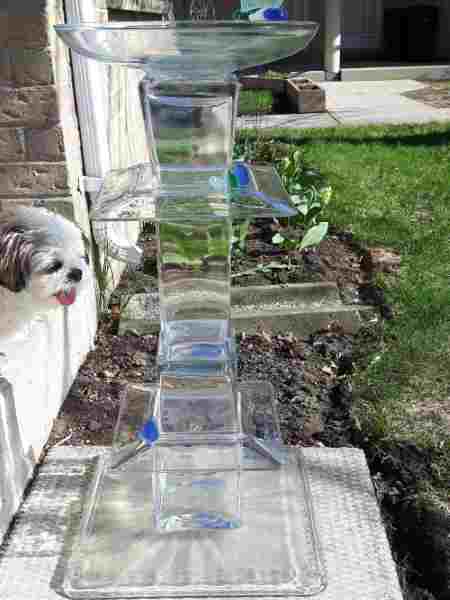
Dimensions, just to give you some idea of the size if you choose similar recycled pieces:
Weight: 25lbs/11.3kgs
Stands: 30in/76.2cm high
Base is: 14.5in/36.83cm square
Bath bowl: 13in/33cm diameter
Step 1: Assemble The Items You Will Need To Make This Homemade Bird Bath
The Tower Pieces
- An assortment of glass vases and plates that look good together for this upcycled birdbath.
I chose 4 square vases and 2 square glass plates.
Consider the thickness of your pieces and how well they will fit together.
Mine were all thick and sturdy pieces.
The Base
- A wide base that will create stability for the birdbath.
I found a microwave glass plate that created a good heavy anchor for the whole structure.
It is wider than the other pieces and very heavy making it an excellent anchor for the height.
This base will keep the bath from tipping over easily.
It would take extreme wind or a huge push to topple it over.
The Bath Bowl
- For this bath, I found a round shallow bowl, that measures 2 in/5cm in height in the center.
I think it looks great with the square base and tower pieces adding a nice contrast.
But had I found a square bowl, I would have chosen the square to maintain the squareness. ? - Two inches is the perfect depth for birds to drink and bathe. Any deeper would be too deep for the smaller birds like Finches and Sparrows.
- Learn more about birdbaths in general.
What Type Of Adhesive To Use For This Homemade Bird Bath?
I use one of two kinds of adhesive for most of my homemade projects:
1. Gorilla Glue Clear, for items I want a crystal-clear look.
2. Silicone II which is a silicone caulking which states on the tube that it dries clear, but it is opaque when it dries.
For some projects, it does not matter, but for an item made from clear glass, I would not choose the Silicone II.
Both types of glue are very strong and will last a long time

Buy GE Silicone II here.
Buy Gorilla Clear Glue here.
Both types of glue say they can be used outside through any weather conditions, but I would recommend outdoor objects made of glass be brought in during freezing temperatures, just to keep it looking good.
But, I am going to try leaving this homemade birdbath outside next winter, because it is awkward to carry at 25lbs/11.3kgs.
Step 2: How to Assemble This Homemade Up-cycled Bird Bath
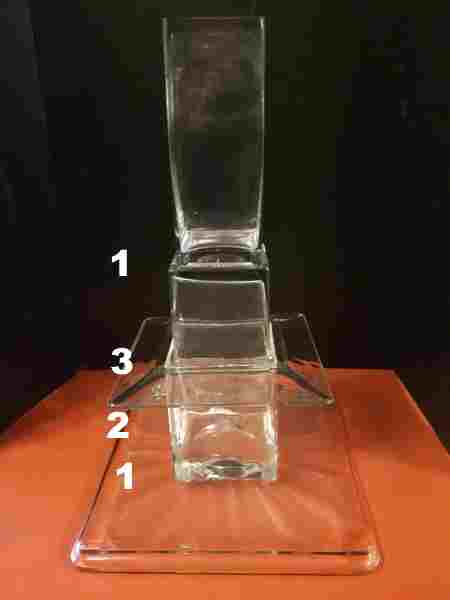
There are a few photos on this page as you can see, to show the stages of construction.
1. Wash all the pieces and dry them well. Let them sit for a few hours to air dry after toweling them. Wait longer for pieces that will be glued, enclosing a container. You do not want to trap any moisture inside.
2. Arrange the pieces before attaching them to get the look you like. Be careful though as this is an easy time for things to slip and crash. Get some help holding the pieces together, to save a disaster from taking place. (I know that from personal experience. ;-))
3. Glue the bath together in sections like this:
– First gluing session: glue the first tower piece to the base; the next two vases together; the top vase to one of the square plates.

Wait 24 hours between gluing sessions before adding a piece to the ones you have already glued, to give the previous days glued seams time to cure.
– Second gluing session: glue the second square plate to the first square vase that was glued to the base in gluing session one; glue the birdbath bowl to the vase that you glued the square plate to, in gluing session one.

– Third gluing session: glue the base with the two other pieces already attached in the first two gluing sessions, to the two vases that were glued together in gluing session one.
– Fourth gluing session: glue the top and bottom sections together.
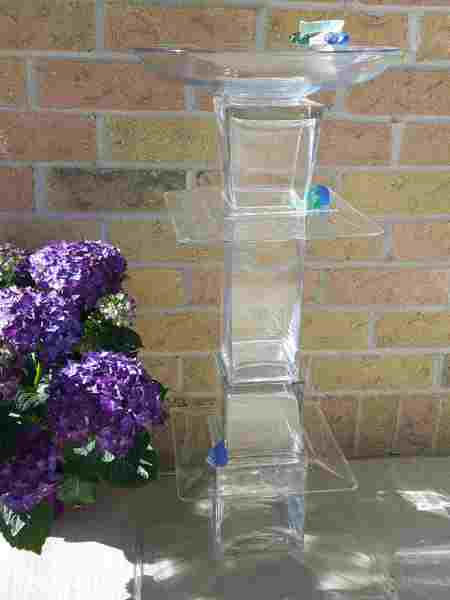
5. Add any embellishments you like. I added colored stones to the one I made. I love the icy, cool look it gives the birdbath.
6. And last, but definitely not the least, keep your new birdbath clean and filled with fresh water. Learn how here.
My re-cycled, upcycled, homemade birdbath is absolutely beautiful in the sunlight! The photos really do not do it justice.
It is an asset to any yard, patio, or even as an indoor piece.
It would make a great key holder!

Buy Sea Glass Multi-color Rainbow Mix here.
Have fun with it and please share your recycled, upcycled, repurposed, homemade birdbath plans of your own, below!
- Dust Baths, sunbathing and “anting” may seem like odd practices to humans, but we actually practice activities for the very same purposes.
- Cleaning Bird Baths on a regular schedule is very necessary for wild bird health and enjoyment.
- Heated Bird Baths are a wonderful way to provide water for wild birds in winter in areas where the temperatures reach the freezing mark.
- #1 Heated Birdbath Review will point out the benefits and the drawbacks of this favorite & versatile heated birdbath.
- Homemade Bird Bath How to make a recycled, upcycled birdbath by repurposing used items. The birds love it and it is beautiful too.
- Bird Bathing Info A bath for birds also provides a basic need for the wild birds too and that is water to drink to sustain their lives.
